Friday, August 31, 2012

Mostly gypped

Day 2 of gypsum boarding.

Gypsum board is also known as drywall or plasterboard. Basically is a panel of gypsum plaster pressed between two sheets of paper board. They are generally 1/2 an inch thick and used to make interior walls, or in this case fill up the existing holes that were put in the wall for the purpose of rewiring, patching things up etc. There are thinner gyp board of 1/4 inch, but according to the guys, they are easily warped, so basically shouldn't be used. This came up because I really dislike the ceiling being so low, in fact 2.5 inches lower than necessary... I was hoping to have as thin a gyp board as possible. Now why 2.5 inches? Well, remember the fatal 1/2 inch from an earlier post? A mistake. And the other 2 inches are because of the wish to flush with the top of the cabinets which are 84 inches. When Noor first asked me 
"Is 84 inches ok for all the cabinets?" I said yes without thinking that the maximum ceiling height is 86", not 84". I believe the reason he applied this restriction is because the particular Plyboo strand bamboo plywood Noor is using for the cabinets comes in the length of 84"...I should have checked the height possibility better. And the original drawings of Jessica do not have the dimensions written out, thus, another mistake.

Anyway, most of the openings in the walls are gypped, including the new ceiling and some new posts. I see that there are extra yellow tapings all around the gaps. I suppose it will be plastered tomorrow.


Guest room all patched up.

Jessica's room all patched up.


The toilet tank in the wall and the bathrooms ceilings are also gypped.


The in wall toilet tank and in wall faucet and the new ceiling.

New door to the master bathroom. OK old toilet is still there for the constructors.

Bathroom ceiling and side.


Thursday, August 30, 2012

PASSED

August 29th 2012 we passed inspection on plumbing, electrical and mechanical!

I had to do a walk through this morning before the wall is closed.

So what's in the wall so far?
Junction boxes for lights. Junction boxes for outlets. Light switches. TV wirings and CatV cable. Wirings for all the appliances. New updated electrical box. Rough-ins for showers. Rough-ins for the wall hung faucet.
The all so problematic wall-hung toilet. They are all in place.

Let's close the wall and ceiling.


Tuesday, August 28, 2012

ToTo Semi Relief...

Finally the in wall toilet tank is in! And the hole in the ground is out. A Hail Mary installation less than 2 weeks ago is now actually in order and looks pretty darn good. Well I'm not totally at ease until the toilet bowl is hung and when the actuator is functioning. However, in the mean time, I can breathe easily for at least a few days.

In-wall toilet tank. No more hole in the ground! Front and back!


The rough-in for the wall mount faucets are also installed. All the problems with the guest bathroom is solved, for the time being.

I sure hope that the placement is correct and aligned with where the sink is going to be.


The ceiling fans in both bathrooms are also nicely tucked inside the 6-inch built down ceiling. The pipe to the exterior are also moved and anchored.
Fan in the guest bath shares the same outlet as the master bath.

See the hole on the wall to the right. That was where the original outlet was. The new one is moved higher.


Shower drain hole in the master shower is also installed. Too bad we cannot use Jessica's design for this. It would be so much nicer and won't break up the tiles if we could use the pro line drain rather than this big ugly hole in the middle. The pro line drain is nicely hidden on the side with the shower pan sloping towards it. The whole tub area could then be one continuous tile work. Sigh!!!!

So not elegant ;(


Back to the kitchen. New vent pipes to be hidden in the cabinet.


And that's plumbing ready for city inspection!

Friday, August 24, 2012

Kitchen Cabinets: Almost Ready.

I signed the original kitchen cabinetry contract with Noor back on June 6th. Since then there have been 2 other additional contracts including the living room cabinetry, bathroom cabinetry and medicine cabinets and today we signed another contract on getting the quartz counter top for the kitchen.

Jessica did the original design of the cabinets and layout, since then we have had many revisions. I suppose one of the major departures is the elimination of the wall in the entry hallway. Both for the reason of gaining storage space and a bit of a mod design element. (I did struggle a bit on that, but the eventual decision was to go with something "bold.") However, after rethinking about it, I'm not sure if I'm not having another one of my regretful moments... especially after I realize that the backsplash is much higher than how I envisioned it! There's also the error of not having the continuous plug mold underneath the cabinet. Apparently that was in the original design, but I didn't pick it up from the schematic diagram, so now I'm stuck with having the outlets on the backsplash. It would have been nicer and cleaner... Oh well, the cabinets are done, it's too late. I'm not so crazy as to redo that whole region.
Here are the two elevation diagrams:

Elevation 1: view from hallway, and into the hallway

Elevation 2: Garage facing and the island.


Another big departure from the original design is the material. Instead of going with matte white lacquer and a few wood panels, I'm going with mostly bamboo plywood with a natural finish. I went with this because I'm making custom cabinets, I feel that I would like some custom finish instead of a generic white lacquer where you can get from most suppliers. All the cabinets are made with Birch interior with Plyboo bamboo plywood exterior.

Back opening as in elevation 1. This is an example of the finish look of the wood.

The "counter" top of the opening. Backsplash will be placed in the unfinished wood area.


The third and possibly the riskiest departure is the sliding doors and a much bigger garage appliance, thus a roll up door is devised.

The garage appliance roll up door (partial) as in elevation 2 diagram.

The corner. The opening will be the garbage/recycle cans. The lost corner is use to hide the piping.

Detail of the garage door.


Last but definitely if not the most, then it's the next to most visibly different element: the color scheme. Aside from white and wood, I introduce orange into the cabinets. The back panel of the recessed bookcase is in orange and so are all the sliding doors. However, I did make a backup plan for the sliding doors (for insurance purpose), they are reversible and the flip side is white.

Dining room facing side of the island. See elevation 2.

The orange sliding door. Very mod indeed.

Here are a few more pictures showing some details of the workmanship:

A trench on the under side of the upper cabinets for LED lighting.

Showing the miter corner of the back panel facing hallway.

Edge details. Nice work.

Disregard of certain unforeseen regrets, the cabinets are very well made. The time it took to get the right finishing color also took months of trials and errors. I asked for the same color as the unfinished wood, and it's not as easy to obtain as I imagined. Instead of just applying a clear stain, which results in a much darker, more yellow tone color, this final color is achieved through a complicated bleaching process and then staining. Needless to say, the orange was even a bigger challenge. I hope after the eventual installation at my house with the right lighting, I will still like the color as much as I liked them in their little swatches.

Thursday, August 16, 2012

The Fatality of Half an Inch!

While waiting for the verdict on the toilet, let me tell you about another surprise! After just a month of dealing with this project, I can assure you that renovation is a synonym for unpleasant surprise!

Just 10 days ago I was quite pleased with the beautiful new soffit in the kitchen. It looked nice and the ceiling is leveled, gone is the 3 inch height difference corner to corner. The next day the electrician was in to put in the socket for the recessed lights. Things are really moving.

New soffit and leveled ceiling


Recessed bucket installed.


Aside from the ceiling, all electrical wirings in the living room are done. There is a pipe in the concrete trench leading from the kitchen island to the main panel.


So all is well but did anyone forget to measure the height? Apparently so. The cabinets and fridge require a 84" clearance. The soffit was built down to end up having a 84" height between floor and ceiling. That's exactly what happened, but the floor is not in yet, the carpenters forgot that the cabinets are to sit on top of the floor!!! Once the 0.5" floor is installed, there is only 83.5" in height. It's half an inch less than required.

In the mean time the frames and most of the cabinets are done. I posted pictures of those a few weeks ago. And guess what, they are 84". This half an inch is essential, so either the cabinets have to be chopped, or the soffit needs to be rebuilt and the light sockets need to be reinstalled. That's 3 or 4 days of work and materials. Who is going to pay for all this? I don't think it should be me. But even when you've been reassured that that's a mistake and it won't cost you, how do I really know? It's quite hard to say as everything is an estimate after all. This half an inch is very costly.

Wednesday, August 15, 2012

ToTo Agony

And the Toto saga continues!


Email from contractor:

I opened the toilet box today, but there is no wall hang bracket. Did you order them?? It's not in the box.

Huh? What bracket? I ordered the toilet, I didn't know that I need to order something else... No one told me anything. Not my architect, not my contractor. I just bought a toilet, how do I know that there are separate parts to be procured...So what should I do? In fact, why am I doing this? Shouldn't the experts be handling the purchase of different parts? I can buy them, but shouldn't they tell me what to buy?
Well, but my architect is MIA and the contractor just told me that he has not installed this kind of toilet before, and he will look into it.

Monday, August 13, 2012

Toto Frustration

There must be something between me and Toto toilets! First there was the issue with Title 24 (see my post back in July); actually I need to make a retraction on that... So apparently Title 24 is not that ridiculous, it's the contractor that made a mistake and told me that my chosen toilets cannot be installed. After learning about the restriction, I basically refuse to believe that a toilet with a green rating cannot be installed. I started researching on the internet and found the actual Title 24 document. After combing through it, I finally found the following toilet requirement:


Includes single and dual flush water closets with an effective flush of 1.28 gallons or less. Single Flush Toilets - The effective flush volume shall not exceed 1.28 gallons (4.8 liters). The effective flush volume is the average flush volume when tested in accordance with ASME A112.19.233.2. Dual Flush Toilets - The effective flush volume shall not exceed 1.28 gallons (4.8 liters). The effective flush volume is defined as the composite, average flush volume of two reduced flushes and one full flush. Flush volumes will be tested in accordance with ASME A112.19.2 and ASME A112.19.14.

The toilets are dual flush which satisfied the effective flush volume of the average flush volume of 2 reduced flushes and 1 full flush. For 0.9/1.6, the effective flush volume is 1.133, actually below the 1.28 requirement by almost 15%.

It's page 18 of this article:
http://www.hcd.ca.gov/codes/shl/CALGreenGuide_COMPLETE_6-10.pdf

Good thing I didn't give in and go pick an ugly toilet or go with the suggestion of installing a cheap one and then exchange for the correct one once inspection is done. Phew!

So what's the new drama with Toto? After confirming that I can get the toilets I want, I decided to buy them online. Usually it's like 20% cheaper and no tax. However, they are being delivered through UPS ground with a tracking info showing only which day they are being delivered but not when, not even the ridiculous 4 hour window. It's basically a full day window. Usually that's not a problem if there are workers in the house. But today there are none! So I called up UPS and asked them to give me a better idea of when the toilets will be delivered. First she told me that she has no other information other than it's on a truck since 6am this morning. Nothing more than what the UPS tracking site provides. So I asked her to call the driver to get an estimate as I know that for certain route it is usually at a particular time of the day. I know that for sure as UPS always deliver packages to my company around the same time everyday. My problem is that I don't usually send packages home, thus I don't know the rough time of delivery around my house. But she told me that she has no idea where the truck is, and which truck the package is in. Now I really don't believe that for a second. Of course they know which package is in which truck, there's no way they don't track that. How about if they discover that someone is sending a bomb, they should be able to get to the right truck!!! I then asked her who is responsible for lost packages if they are left in the front door and got stolen, and she  doesn't know. Whether the package is being left on the front yard or not also is up to the driver, so she doesn't know. Basically she doesn't know anything... and I ended up staying in my car outside my house the whole afternoon waiting for the toilets. And that's why I'm venting now.

Monday, August 6, 2012

Two parts ceiling

To be exact, it's not really the new ceiling but rather new soffit. So a soffit is the underside of an architectural structure such as an arch, an overhang or a dropped ceiling. Again, since there are no crawl space between the roof and the ceiling, to put in recessed lights a soffit needs to be built to house the fixtures. Another reason for the soffit is to have the top of the cabinets level with the ceiling.

The original soffit in the kitchen was found to have a 3 inch disparity corner to corner. Most likely it's due to the hidden removed post I mentioned in the beginning of July that we discovered after the cabinets were removed. Besides, the positions of the lights and the extent of the new cabinets make it impossible to reuse the original soffit. This is the first carpentry work in the house, and the crew seems to be rather efficient.


For the post between the living room and the kitchen there will be cabinets, so the post is extended to 16.5" to enclose the cabinets.


The second soffit is built in the bathrooms. Due to the new style ventilation, the 2nd bathroom needs to be connected to the exhaust in the master bathroom. To hide the pipeline to the exhaust, a part of the ceiling has to be dropped. I thought that would not look nice, so the compromise is to have a 6" drop down soffit in both of the bathrooms. The ceiling in an Eichler is already rather low, but at least it's better this way than having some random drop downs here and there.

I hope the finished ceiling won't feel too claustrophobic...

Other carpentry work includes cutting out the right space to recess the medicine cabinet. Seriously the amount of stuff between the walls are unbelievable. You can also see all the new electrical wirings all lined up there too.
Later on, we will soon have the built in faucet, toilet and more. Amazing use of space between the wall.

Just in case you don't remember, the picture to the left was before the cut out, the picture to the right is the framed space for the medicine cabinet:


this is the cut out framed space in the master bedroom


See all the nicely weaved electrical cables.

And last of all, the frame of the new door to the bathroom. It didn't use to exist, so now there will be a set of matching doors in the master bedroom.


Talking about doors, there are so many hideous door knobs. Of course the nice ones are just ridiculously priced. Actually so are some really crazy looking ones too. No surprise there.

Friday, August 3, 2012

1st Mensiversary

I know that mensiversary doesn't exist, but hey, if anniversary is the combination of annus ‘year’ versus ‘turning,’  to mean the date an event took place in a previous year. I can use the latin word for month to create a new word to mean the date an event took place in a previous month. I present to you mensis ‘month’ versus ‘turning,’ => mensiversary. Why not?

So it's been one month since the first day of demolition! I just want to take a moment to commemorate this milestone. The house has been successfully gutted with partial new concrete, partial new wirings, completion of kitchen and living room cabinetry design, procurements of most appliances, faucets and sinks and of course numerous worms from opening this big can which is my house.

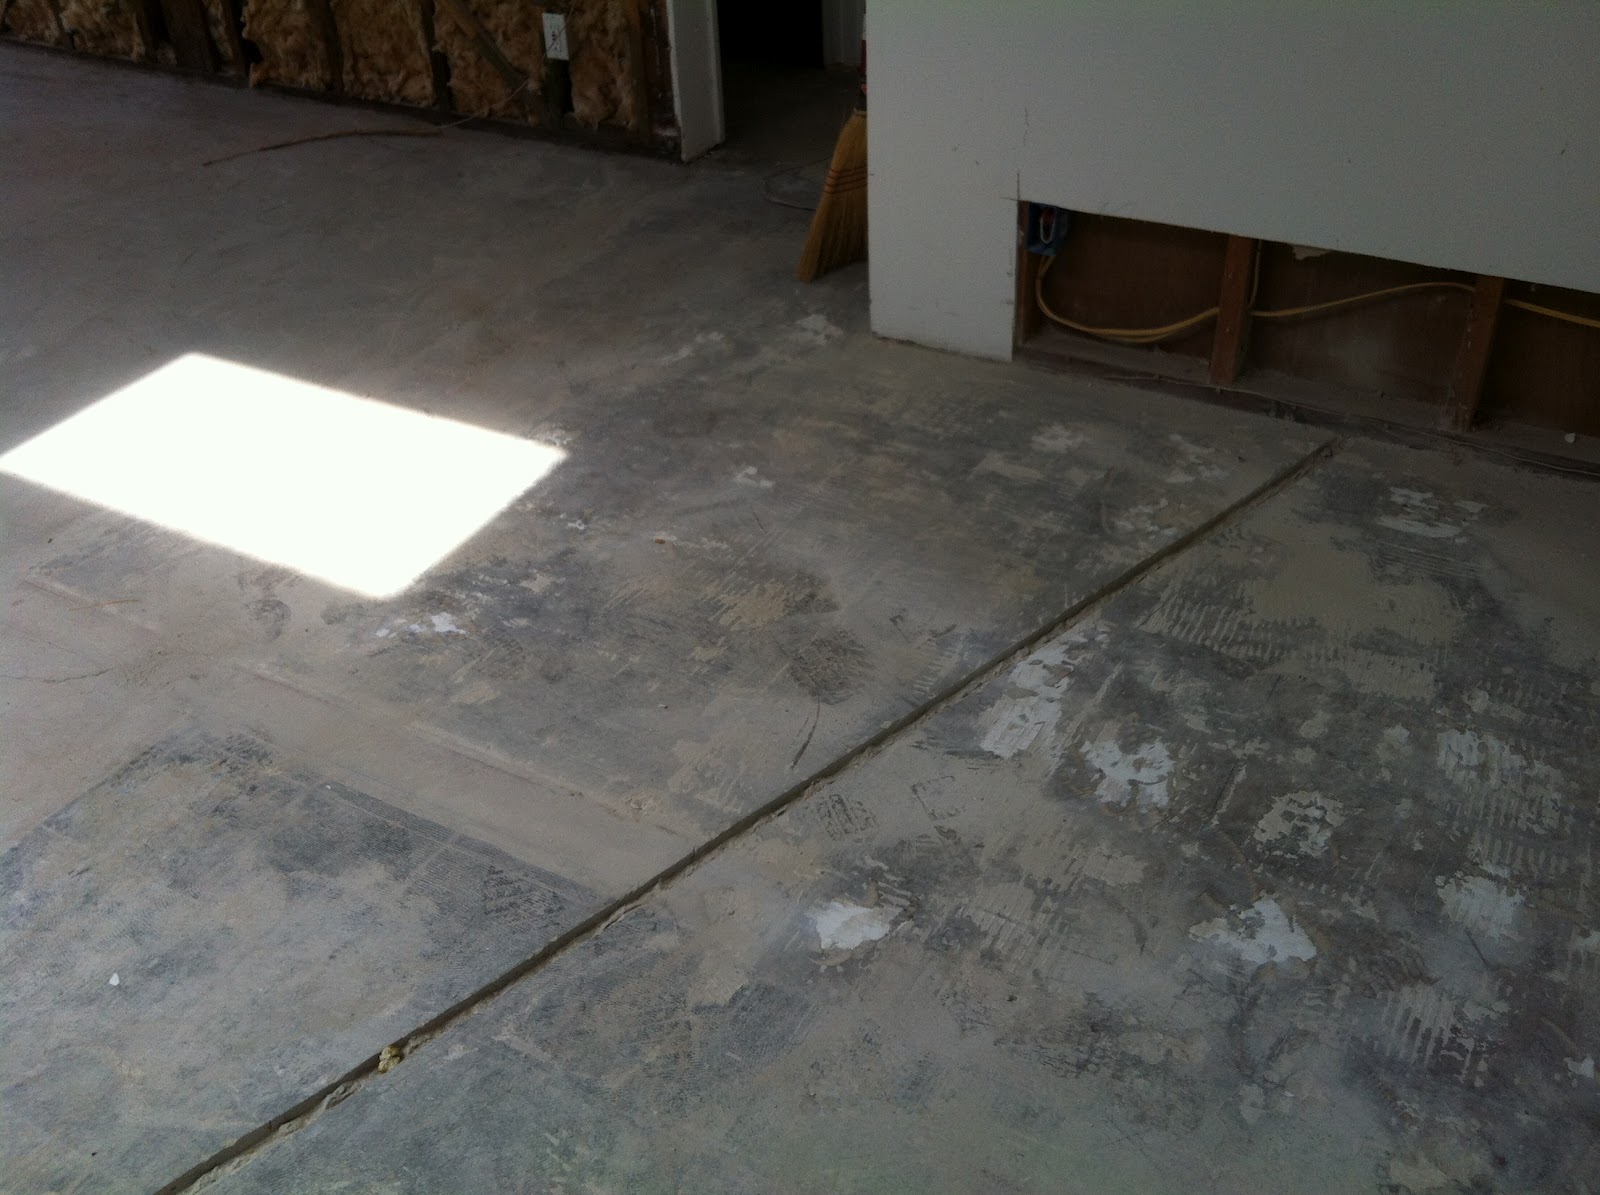
This is the latest picture of a nicely cut trench leading from the wall to the center of the room so as to provide electricity to the kitchen island. Eichler houses are a pain in the neck when you want to rewire stuff. The idea of no crawl space and heated floor is wonderful until you have to reroute things around...


When I first bought the house I really like the idea of no crawl space underneath the house as I'm extremely scare of rats, and other creepy crawlies, but in particular rats and their tails. Eww, just thinking about it gives me the creeps. Anyway, so no crawl space means no need to worry about rats under the floor board, however, how do you lay out wires to the middle of the room without breaking the concrete?